Introduction
Many of our users have expressed interest in using DD-WRT or related routers to connect to CloudConnexa instead of using the Connector application.
While connecting in this manner may not yield the best performance, due to the limited processing power and memory of the router, it could be useful in the cases where convenience, rather than high throughput, is required.
Please note that the information provided here is for EDUCATION and INFORMATIONAL uses only. We are not responsible for any damages you incur as a result of using these instructions here. For technical support, you need to contact the supplier of the router or the appropriate community forums.
It is not guaranteed that all versions of the firmware will work as expected with CloudConnexa and some features may be incompatible. It is best to update the firmware to the latest version.
Downloading the Connector profile
To configure the routers you need to use specific sections of the CloudConnexa Connector profile in specific setting configurations.
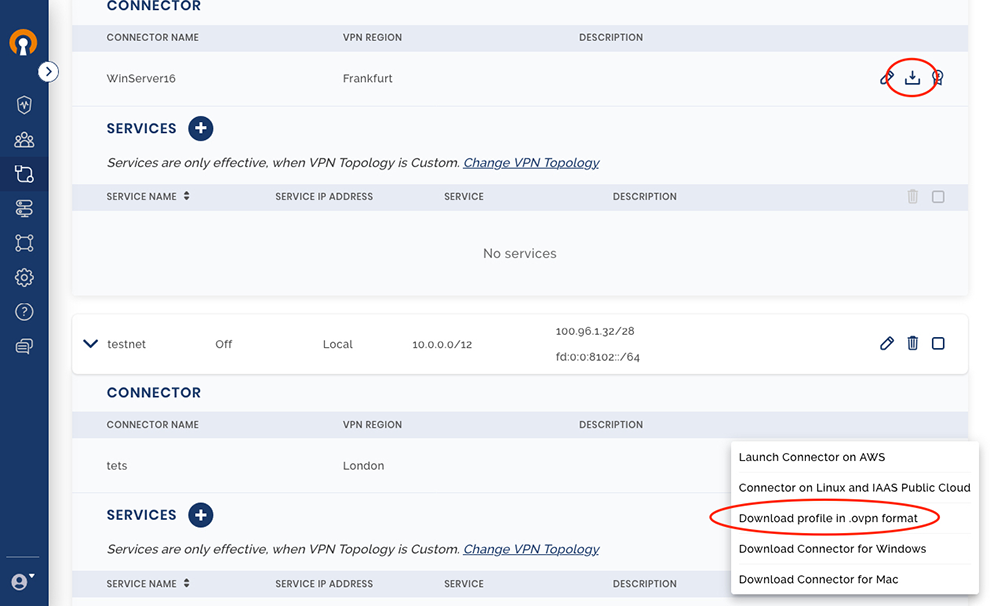
First, you need to download the profile in .ovpn format from the Network configuration you have created in the Administration portal to represent the router’s network.
The profile can be downloaded by selecting it as the option in the drop-down list shown after clicking on the download icon. See, picture.
Configuring DD-WRT
Before you begin, make sure your router is properly configured for a NTP server. This setting could be found under the Setup tab in your router configuration. Under Time settings, make sure the NTP Client is set to Enable and the Server IP / Name is populated with a proper time server. If you do not know what your time server is, please fill in time.nist.gov in the text box as indicated.
Afterward, visit the Services tab, then the VPN tab. Under the section Start OpenVPN Client, click the Enable radio box. If you do not see this section, it is possible that your DD-WRT build is not OpenVPN enabled. Please consult the proper DD-WRT documentation for more information on the various DD-WRT builds.
Once you have selected that option, also check the Enable option under Advanced Options, this will allow you to define options required for the VPN connection to work.
The following screen should then be displayed, as depicted below:

CONFIGURATION DESCRIPTIONS:
Start OpenVPN Client: Enables/Disables the OpenVPN client connection.
Server IP/Name: The hostname of the VPN server you are trying to connect to. Look inside your profile for entries starting with remote. For example, the entry remote us.shieldexchange.com 1194 udp indicates that the hostname is us.shieldexchange.com.
Port: The port number the VPN server is listening on. If you do not know what this is, either look for the port number in remote entries such as the one shown in the previous example. In the previous example, the port is 1194. If your server is only using a single port, you may see the port number specified using the port directive (e.g. port 1194). It is preferable that you choose UDP ports over TCP, as UDP provides better reliability for your VPN sessions.
Tunnel Device: Select TUN
Tunnel Protocol: Select UDP
Encryption Cipher: Select whatever appears on the cipher line of the profile. By default, AES-256-CBC is used for CloudConnexa .
Hash Algorithm: Select whatever appears on the auth line of the profile. By default, SHA256 is used for CloudConnexa .
nsCertType verification: Checks to see if the remote server is using a valid type of certificate meant for OpenVPN connections. As this is a security feature of OpenVPN, it should be left enabled.
Advanced Options: As described previously, this option must be Enabled for you to set the required options necessary for a successful VPN connection.
LZO Compression: Enables compression over VPN. This option should be Disabled.
NAT: Creates a NAT layer over the VPN tunnel. This should be Enabled if you plan to have all your client’s traffic to be sent over the VPN tunnel under the shared VPN IP address assigned by CloudConnexa . If you want to send traffic from your clients directly over the tunnel without any address modification(s) (e.g. If you were using Advanced Routing), then this option should be Disabled. It is highly recommended that you turn this option ON, unless you know what you are doing.
Local IP Address: Specify a IP address that your OpenVPN tunnel should use. This field is usually not applicable, since CloudConnexa automatically assigns an address upon a successful connection.
TUN MTU Setting: The maximum transmission unit (MTU) used over the VPN tunnel. Leave this at 1500, unless otherwise directed by a support staff or a network professional.
MSS-Fix/Fragment across the tunnel: Unless directed otherwise by a support staff or a network professional, leave this field blank.
TLS Cipher: What encryption algorithm OpenVPN should use for encrypting its control channel. Selecting None will allow DD-WRT to auto-negotiate the strongest available cipher.
TLS Auth Key: The static key OpenVPN should use for generating HMAC send/receive keys. You may find this key surrounded by the <tls-auth>..</tls-auth> brackets. Copy the contents from your profile, starting from –BEGIN OpenVPN Static key V1– until you reach –END OpenVPN Static key V1–.
Additional Config: Any additional configurations you want to define for the VPN connection.
Policy based Routing: This field should be left blank.
PKCS12 Key: This field should be left blank.
Static Key: This field should be left blank.
CA Cert: The CA certificate used by the VPN server, found between the <ca>…</ca> brackets inside the profile. Start copying from –BEGIN CERTIFICATE– until you hit the first –END CERTIFICATE–.
Public Client Cert: The CA certificate used by the VPN client, found between the <cert>..</cert> brackets inside the profile. Start copying from –BEGIN CERTIFICATE– until you hit –END CERTIFICATE–.
Private Client Key: The client’s private key used by the VPN client, found between the <key>..</key> brackets inside the profile. Start copying from –BEGIN RSA PRIVATE KEY– until you hit –END RSA PRIVATE KEY–.
To start the VPN connection, click the Apply Settings towards the bottom of the page. You may view the status of your VPN connection by visiting the Status tab, and then the OpenVPN tab.
Comments
0 comments
Please sign in to leave a comment.